FastAPI - 13 (JSON 호환 인코더 / 본문 업데이트)
jsonable_encoder
출처: https://fastapi.tiangolo.com/tutorial/encoder/
아래의 내용은 공식 사이트의 내용을 제 경험과 생각을 추가하여 다시 정리한 것 입니다.
jsonable_encoder는 pydantic의 BaseModel을 JSON 호환으로 변환하는 함수 입니다. JSON 호환 가능 유형은 dict, list 등이 있습니다.
예시 코드 - jsonable_encoder
사용자가 입력된 값을 Item 모델의 인스턴스로 생성하고 jsonable_encoder를 이용 하여 dict 유형으로 변환 합니다.
from datetime import datetime
from typing import Union

from fastapi import FastAPI
from fastapi.encoders import jsonable_encoder
from pydantic import BaseModel

fake_db = {}


class Item(BaseModel):
    title: str
    timestamp: datetime
    description: Union[str, None] = None


app = FastAPI()


@app.put("/items/{id}")
def update_item(id: str, item: Item):
    json_compatible_item_data = jsonable_encoder(item)
    fake_db[id] = json_compatible_item_data
    print(fake_db)
    return fake_db
주석(설명) 있는 예시 코드
from datetime import datetime
from typing import Union

from fastapi import FastAPI
# jsonable_encoder import
from fastapi.encoders import jsonable_encoder
from pydantic import BaseModel

# Database에 사용할 dict(가정)
fake_db = {}


# Database에 사용할 Item 모델
class Item(BaseModel):
    title: str
    timestamp: datetime
    description: Union[str, None] = None


app = FastAPI()


# 경로 매개변수 id를 사용하여 id를 지정
@app.put("/items/{id}")
# id의 타입을 str로 지정
# request body 요청을 item의 타입을 Item으로 지정
def update_item(id: str, item: Item):
    # jsonable_encoder를 사용하여 item을 JSON 호환으로 변환
    json_compatible_item_data = jsonable_encoder(item)
    # 변환된 값을 id를 key로 해서 fake_db에 저장
    fake_db[id] = json_compatible_item_data
    # 변환된 값을 보기 위해 출력과 return(공식 사이트 코드에는 없음)
    # fake_db[id]가 아닌 fake_db
    print(fake_db)
    return fake_db
테스트 화면 추가 - jsonable_encoder
위의 코드를 테스트 하기 위해 HTML 화면을 추가 하였습니다.
from fastapi import FastAPI
from fastapi.responses import HTMLResponse
from datetime import datetime
from typing import Union
from fastapi.encoders import jsonable_encoder
from pydantic import BaseModel

fake_db = {}

class Item(BaseModel):
    title: str
    timestamp: datetime
    description: Union[str, None] = None

app = FastAPI()


@app.put("/items/{id}")
def update_item(id: str, item: Item):
    json_compatible_item_data = jsonable_encoder(item)
    fake_db[id] = json_compatible_item_data
    # 변환된 값을 보기 위해 출력과 return(공식 사이트 코드에는 없음)
    print(fake_db)
    return fake_db


# 테스트 화면을 위한 코드
@app.get("/", response_class=HTMLResponse)
async def get_form():
    return """
    <html>
        <head>
            <title>Update Item</title>
            <script>
                async function submitForm() {
                    const id = document.getElementById('id').value;
                    const title = document.getElementById('title').value;
                    const description = document.getElementById('description').value;
                    const timestamp = new Date().toISOString();

                    const response = await fetch('/items/' + id, {
                        method: 'PUT',
                        headers: {
                            'Content-Type': 'application/json'
                        },
                        body: JSON.stringify({title, description, timestamp})
                    });

                    const data = await response.json();
                    alert(JSON.stringify(data));
                }
            </script>
        </head>
        <body>
            <h1>Update Item</h1>
            <form onSubmit="event.preventDefault(); submitForm();">
                <input type="text" id="id" name="id" placeholder="Item ID"><br>
                <input type="text" id="title" name="title" placeholder="Title"><br>
                <input type="text" id="description" name="description" placeholder="Description"><br>
                <input type="submit" value="Update">
            </form>
        </body>
    </html>
    """
테스트 - jsonable_encoder
http://localhost:8000
위의 URL로 접속하면 아래와 같이 id와 title, description을 입력 할 수 있는 화면이 나타납니다.
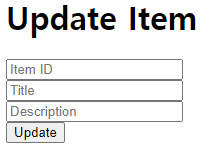
id, title, description 3개의 항목을 입력합니다. id는 upload를 할 때 URL 주소로 사용됩니다(javascript 참조). title과 description은 Item 모델의 title과 description에 저장됩니다.
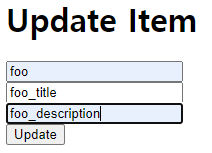
Upload 버튼을 클릭하면 서버에서 Item 모델의 인스턴스를 생성하고 jsonable_encoder를 사용하여 JSON 호환으로 변환한 후 fake_db에 저장합니다. 그리고 변환된 값을 출력하고 변환된 값을 반환합니다.

아래는 서버의 출력 결과 입니다.
{'foo': {'title': 'foo_title', 'timestamp': '2023-12-19T05:21:14.026000Z', 'description': 'foo_description'}}
id가 foo인 Item 모델의 인스턴스가 입력 값 항목을 생성 되었습니다. timestamp는 자동으로 생성되었습니다.
Put 요청
출처: https://fastapi.tiangolo.com/ko/tutorial/body-updates/
아래의 내용은 공식 사이트의 내용을 제 경험과 생각을 추가하여 다시 정리한 것 입니다.
예시 코드 - Put
from typing import List, Union

from fastapi import FastAPI
from fastapi.encoders import jsonable_encoder
from pydantic import BaseModel

app = FastAPI()

# Pydantic의 BaseModel을 사용하여 Item 모델을 생성
class Item(BaseModel):
    name: Union[str, None] = None
    description: Union[str, None] = None
    price: Union[float, None] = None
    tax: float = 10.5
    tags: List[str] = []


# items 값 생성
items = {
    "foo": {"name": "Foo", "price": 50.2},
    "bar": {"name": "Bar", "description": "The bartenders", "price": 62, "tax": 20.2},
    "baz": {"name": "Baz", "description": None, "price": 50.2, "tax": 10.5, "tags": []},
}


# get 요청으로 item 값을 반환
@app.get("/items/{item_id}", response_model=Item)
async def read_item(item_id: str):
    return items[item_id]


# put 요청으로 item 값을 업데이트
@app.put("/items/{item_id}", response_model=Item)
async def update_item(item_id: str, item: Item):
    # jsonable_encoder를 사용하여 item을 JSON 호환으로 변환
    update_item_encoded = jsonable_encoder(item)
    # id를 key로 하여 items에 저장. id가 없으면 생성, 있으면 업데이트
    items[item_id] = update_item_encoded
    return update_item_encoded
테스트 화면 추가 - Put
위의 코드를 테스트 하기 위해 HTML 화면을 추가 하였습니다.
from fastapi import FastAPI, Response
from fastapi.responses import HTMLResponse
from pydantic import BaseModel
from fastapi.encoders import jsonable_encoder
from typing import List, Union

app = FastAPI()

class Item(BaseModel):
    name: Union[str, None] = None
    description: Union[str, None] = None
    price: Union[float, None] = None
    tax: float = 10.5
    tags: List[str] = []

items = {
    "foo": {"name": "Foo", "price": 50.2},
    "bar": {"name": "Bar", "description": "The bartenders", "price": 62, "tax": 20.2},
    "baz": {"name": "Baz", "description": None, "price": 50.2, "tax": 10.5, "tags": []},
}

# 테스트 화면 추가
@app.get("/", response_class=HTMLResponse)
async def get_form():
    return """
    <html>
        <head>
            <title>Update Item</title>
            <script>
                async function submitForm() {
                    const itemId = document.getElementById('item_id').value;
                    const name = document.getElementById('name').value;
                    const description = document.getElementById('description').value;
                    const price = document.getElementById('price').value;
                    const tax = document.getElementById('tax').value;
                    const tags = document.getElementById('tags').value.split(',');

                    const response = await fetch('/items/' + itemId, {
                        method: 'PUT',
                        headers: {
                            'Content-Type': 'application/json'
                        },
                        body: JSON.stringify({name, description, price: parseFloat(price), tax: parseFloat(tax), tags})
                    });

                    const data = await response.json();
                    alert(JSON.stringify(data));
                }
            </script>
        </head>
        <body>
            <h1>Update Item</h1>
            <form onSubmit="event.preventDefault(); submitForm();">
                <input type="text" id="item_id" name="item_id" placeholder="Item ID"><br>
                <input type="text" id="name" name="name" placeholder="Name"><br>
                <input type="text" id="description" name="description" placeholder="Description"><br>
                <input type="number" id="price" name="price" placeholder="Price"><br>
                <input type="number" id="tax" name="tax" placeholder="Tax"><br>
                <input type="text" id="tags" name="tags" placeholder="Tags (comma separated)"><br>
                <input type="submit" value="Update">
            </form>
        </body>
    </html>
    """

@app.get("/items/{item_id}", response_model=Item)
async def read_item(item_id: str):
    return items[item_id]

@app.put("/items/{item_id}", response_model=Item)
async def update_item(item_id: str, item: Item):
    update_item_encoded = jsonable_encoder(item)
    items[item_id] = update_item_encoded
    return update_item_encoded
테스트 - Put
먼저 item이 foo인 상세 값을 확인 합니다.
http://localhost:8000/items/foo
위의 URL로 접속하면 아래와 같이 foo의 상세 값이 나타납니다.
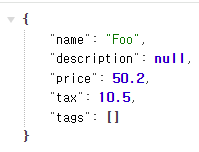
foo를 update 하기 위해 아래의 URL로 접속 합니다.
http://localhost:8000
위의 URL로 접속하면 아래와 같이 id와 name, description, price, tax, tags를 입력 할 수 있는 화면이 나타납니다.
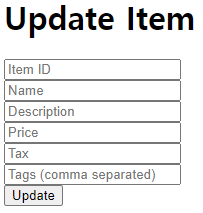
id에 foo를 입력하고 나머지는 update 하고자 하는 값을 입력합니다.
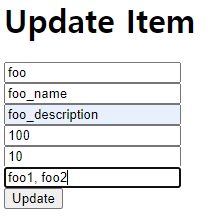
Upload 버튼을 클릭하면 Update 된 foo의 상세 값이 나타납니다.

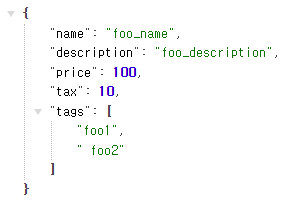
아래의 URL로 다시 접속하여 foo의 상세 값을 확인 합니다.
http://localhost:8000/items/foo
다음과 같이 변경된 foo의 상세 값이 나타납니다.
테스트(Item 생성) - Put
기존에 등록되어 있지 않은 id를 입력하여 item을 생성 합니다.
http://localhost:8000
위의 URL로 접속 하여 기존에 등록되지 않은 id(hong)를 입력합니다.
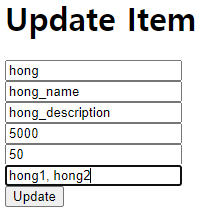
Upload 버튼을 클릭하면 새로운 item(hong)이 생성되고 상세 값이 나타납니다.

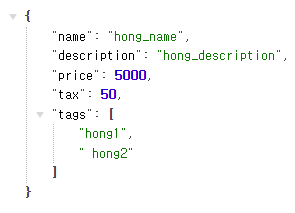
아래의 URL로 다시 접속하여 새로 생성된 item(hong)의 상세 값을 확인 합니다.
http://localhost:8000/items/hong
다음과 같이 새로 생성된 item(hong)의 상세 값이 나타납니다.
해시태그: #fastapi #uvicorn #jsonable_encoder #fastapi put #body update
댓글남기기