FastAPI - 19 (DB - PostgresSQL)
출처: https://fastapi.tiangolo.com/ko/tutorial/sql-databases//
아래의 내용은 공식 사이트의 내용을 제 경험과 생각을 추가하여 다시 정리한 것 입니다.
SQLAlchemy와 ORM
FastAPI와 PostgresSQL을 연동하겠습니다.
PostgresSQL 설치는 PostgreSQL - 01 (설치 - Windows)나 PostgreSQL - 03 (설치 - ubuntu)에서 참고 하시기 바랍니다.
FastAPI에서는 SQLAlchemy를 사용하여 DB를 연동 할 수 있습니다.
SQLAlchemy는 ORM(Object Relational Mapper)로 DB를 객체로 다룰 수 있게 해줍니다.
SQLAlchemy는 다양한 DB를 지원합니다.
ORM(object-relational mapping)은 DB를 객체로 다루기 때문에 SQL을 사용하지 않고도 DB를 다룰 수 있습니다.
SQLAlchemy 설치
pip install SQLAlchemy
psycopg2 설치
PostgresSQL을 사용하기 위해서는 psycopg2를 설치하겠습니다.
pip install psycopg2
디렉토리 및 파일 구성
아래와 같이 디렉토리와 파일을 구성합니다.
.
└── sql_app
    ├── __init__.py
    ├── crud.py
    ├── database.py
    ├── main.py
    ├── models.py
    └── schemas.py
root 디렉토리에 sql_app 디렉토리를 생성하고, __inin__.py를 생성합니다.
inin.py는 해당 디렉토리(sql_app)가 패키지임을 알려주는 역할을 합니다.
나머지 파일들도 생성합니다.
database.py
database.py에는 DB와 연결하는 코드를 작성합니다.
공식 사이트의 코드가 SQLAlchemy 2.0 호환 되지 않는 기능이 있어서 코드를 수정하였습니다.
# create_engine: 데이터베이스 엔진을 생성하는 함수
from sqlalchemy import create_engine
# declarative_base: ORM에서 사용되는 모델 클래스의 기본 클래스를 생성하는 함수
# sessionmaker: 데이터베이스 세션을 생성하는 데 사용되는 팩토리 함수를 임포트
from sqlalchemy.orm import declarative_base, sessionmaker

# PostgreSQL 데이터베이스에 연결하기 위한 연결 문자열
# SQLALCHEMY_DATABASE_URL = "postgresql://user:password@postgresserver/db"
# 데이터베이스: postgresql, 사용자: user01, 비밀번호: user01password, 서버: localhost, DB: db01
SQLALCHEMY_DATABASE_URL = "postgresql://user01:user01password@localhost/db01"

# SQLAlchemy에서 데이터베이스와의 연결을 관리하는 엔진 객체를 생성
# future=True  SQLAlchemy 2.0의 새로운 스타일과 기능을 사용하도록 설정
engine = create_engine(
    SQLALCHEMY_DATABASE_URL, future=True
)


# 데이터베이스 세션 객체를 생성
# autocommit=False는 자동 커밋을 비활성화하여, 트랜잭션을 수동으로 관리
# autoflush=False는 세션에서 객체의 상태가 변경될 때 자동으로 SQL 플러시를 하지 않도록 설정
# bind=engine는 세션을 데이터베이스 엔진에 연결
SessionLocal = sessionmaker(autocommit=False, autoflush=False, bind=engine, future=True)

# declarative_base() 함수를 호출하여, 모든 ORM 모델이 상속받을 기반 클래스(Base)를 생성
Base = declarative_base()
위의 코드로 PostgreSQL에 연결하고, 모든 ORM 모델이 상속받을 기반 클래스(Base)를 생성합니다.
models.py
models.py에는 SQLAlchemy models을 생성합니다.
# SQLAlchemy의 여러 타입: 데이터베이스 테이블의 컬럼을 정의
from sqlalchemy import Boolean, Column, ForeignKey, Integer, String
# 다른 테이블과의 관계를 정의하는 데 사용
from sqlalchemy.orm import relationship

# 조금 전 작성한 database 모듈의 Base 클래스: 모델 클래스의 기본 클래스로 사용
from .database import Base


# User 모델 클래스를 정의: Base를 상속받아 SQLAlchemy ORM에서 사용
class User(Base):
    # 이 클래스가 매핑될 데이터베이스 테이블의 이름
    __tablename__ = "users"

    # 컬럼 정의: Column 함수를 사용하여 타입과 옵션을 지정
    id = Column(Integer, primary_key=True, index=True)
    email = Column(String, unique=True, index=True)
    hashed_password = Column(String)
    is_active = Column(Boolean, default=True)

    #  relationship 함수를 사용하여 Item 모델과 연결
    items = relationship("Item", back_populates="owner")


# Item 모델 클래스를 정의: Base를 상속받아 SQLAlchemy ORM에서 사용
class Item(Base):
    __tablename__ = "items"

    id = Column(Integer, primary_key=True, index=True)
    title = Column(String, index=True)
    description = Column(String, index=True)
    # ForeignKey를 사용하여 users 테이블의 id 컬럼과 연결
    owner_id = Column(Integer, ForeignKey("users.id"))

    # relationship을 통해 User 모델과 연결
    owner = relationship("User", back_populates="items")
SQLAlchemy의 사용하여 데이터베이스 테이블과 컬럼을 정의합니다.
schemas.py
schemas.py은 Pydantic model(schemas)을 생성합니다.
# List와 Union 타입 힌트를 위한 typing 모듈
from typing import List, Union
# Pydantic 모델의 기본 클래스
from pydantic import BaseModel

# ItemBase라는 Pydantic 모델 클래스를 정의
class ItemBase(BaseModel):
    # 문자열 타입
    title: str
    # 문자열 타입 이거나 None
    description: Union[str, None] = None

# ItemBase를 상속받는 ItemCreate 클래스. 아이템 생성 시 사용
class ItemCreate(ItemBase):
    pass

# ItemBase를 상속받는 Item 클래스를 정의
class Item(ItemBase):
    id: int
    owner_id: int

    # internal 클래스 Config를 정의
    # class Config 내에서 orm_mode = True를 설정
    # Pydantic 모델이 ORM 모델과 호환되도록 설정
    class Config:
        orm_mode = True

# UserBase라는 Pydantic 모델 클래스
class UserBase(BaseModel):
    email: str

# UserBase를 상속받는 UserCreate 클래스
class UserCreate(UserBase):
    password: str

# UserBase를 상속받는 User 클래스
class User(UserBase):
    id: int
    is_active: bool
    items: List[Item] = []

    class Config:
        orm_mode = True
UserBase
기본 모델 정의: 사용자 데이터 모델의 기본 필드와 구조를 정의합니다. 사용자 모델에 공통적으로 포함되어야 하는 필드들이 정의됩니다.
예시: 사용자의 이메일 주소 같은 기본적인 정보가 포함될 수 있습니다. 이 정보는 사용자를 생성, 조회, 업데이트하는 데 필요한 공통 필드입니다.
UserCreate
생성 모델 정의: 새로운 사용자를 생성할 때 필요한 데이터 구조를 정의합니다. UserBase를 상속받아 필요한 추가 필드나 검증을 포함할 수 있습니다.
예시: password와 같은 추가 정보가 필요할 수 있습니다.
User
전체 모델 정의: 데이터를 읽거나 API 응답으로 사용되는 전체 사용자 모델을 정의합니다. UserBase를 상속받고, 데이터를 읽을 때 필요한 추가 필드를 포함합니다.
예시: 데이터가 생성되기 전에는 id가 없지만, 데이터를 읽을 때는 이미 id를 알고 있습니다. 그리고 API의 응답으로 password를 포함시키지 않습니다.
ORM 모드 설정: internal Config 클래스로 Pydantic의 ORM 모드를 활성화하여 ORM 객체와의 호환성을 제공합니다. 데이터베이스 객체를 Pydantic 모델로 쉽게 변환할 수 있습니다.
용도: 주로 데이터베이스에서 사용자 정보를 조회하거나 API 응답을 생성할 때 사용됩니다.
crud.py
crud.py는 데이터를 생성, 조회, 업데이트, 삭제하는 함수를 정의합니다.
CRUD: Create, Read, Update, Delete.
# 클래스는 데이터베이스 세션을 관리
from sqlalchemy.orm import Session
# 조금 전 작성한 models(데이터베이스 모델)과 shcemas(Pydantic 스키마)
from . import models, schemas

# user_id를 기반으로 사용자를 조회하는 함수
def get_user(db: Session, user_id: int):
    return db.query(models.User).filter(models.User.id == user_id).first()

# 이메일을 기반으로 사용자를 조회하는 함수
def get_user_by_email(db: Session, email: str):
    return db.query(models.User).filter(models.User.email == email).first()

# 여러 사용자를 조회하는 함수: skip과 limit로 조회할 사용자의 범위를 지정
def get_users(db: Session, skip: int = 0, limit: int = 100):
    return db.query(models.User).offset(skip).limit(limit).all()

# 새로운 사용자를 생성하는 함수
def create_user(db: Session, user: schemas.UserCreate):
    fake_hashed_password = user.password + "notreallyhashed"
    db_user = models.User(email=user.email, hashed_password=fake_hashed_password)
    db.add(db_user)
    db.commit()
    db.refresh(db_user)
    return db_user


def get_items(db: Session, skip: int = 0, limit: int = 100):
    return db.query(models.Item).offset(skip).limit(limit).all()

# db: Session - SQLAlchemy Session 객체
# item: schemas.ItemCreate - 생성할 아이템의 데이터를 담고 있는 Pydantic 모델
def create_user_item(db: Session, item: schemas.ItemCreate, user_id: int):
    # ItemCreate 스키마로부터 받은 데이터를 사용하여 Item 모델의 새 인스턴스를 생성
    # **item.dict()는 Pydantic 모델을 딕셔너리로 변환하여 키워드 인자로 전달
    db_item = models.Item(**item.dict(), owner_id=user_id)
    db.add(db_item)
    db.commit()
    db.refresh(db_item)
    return db_item
db.query(models.User).filter(models.User.email == email).first()
db.query(models.User): Session 객체의 query 메소드를 사용하여 User 모델에 대한 쿼리를 생성합니다. 여기서 models.User는 데이터베이스의 사용자 테이블에 매핑된 SQLAlchemy 모델입니다.
.filter(models.User.id == user_id): 쿼리에 필터를 적용합니다. 이 필터는 User 모델의 id 필드가 매개변수 user_id와 일치하는 경우에만 사용자 데이터를 반환하도록 합니다.
.first(): 필터링된 결과 중 첫 번째 결과를 반환합니다. 이는 일치하는 사용자가 없는 경우 None을 반환하거나, 있으면 해당 사용자 객체를 반환합니다.
main.py
main.py는 지금까지 작성한 코드를 통합하고 사용합니다.
from typing import List

from fastapi import Depends, FastAPI, HTTPException
from sqlalchemy.orm import Session

# 조금 전 작성한 모듈들
from . import crud, models, schemas
from .database import SessionLocal, engine

# 정의된 모든 모델에 대한 데이터베이스 테이블을 생성
models.Base.metadata.create_all(bind=engine)

app = FastAPI()


# 데이터베이스 세션을 생성하고 제공하는 의존성 함수
def get_db():
    db = SessionLocal()
    try:
        yield db
    finally:
        db.close()


# 새 사용자를 생성하는 API 엔드포인트
# response_model: schemas.User - 응답 본문의 데이터를 파싱하고 검증하기 위해 Pydantic 모델을 사용
@app.post("/users/", response_model=schemas.User)
# 의존성 함수 get_db를 사용하여 데이터베이스 세션을 주입
# user: schemas.UserCreate - Pydantic 모델을 사용하여 요청 본문의 데이터를 파싱
def create_user(user: schemas.UserCreate, db: Session = Depends(get_db)):
    # crud.py에 정의된 get_user_by_email 함수를 사용하여 이메일로 사용자를 조회
    db_user = crud.get_user_by_email(db, email=user.email)
    # 이미 등록된 사용자인 경우 예외 발생
    if db_user:
        raise HTTPException(status_code=400, detail="Email already registered")
    return crud.create_user(db=db, user=user)


# 사용자 목록을 조회하는 API 엔드포인트
@app.get("/users/", response_model=List[schemas.User])
# skip과 limit을 사용하여 조회 범위를 조절
def read_users(skip: int = 0, limit: int = 100, db: Session = Depends(get_db)):
    users = crud.get_users(db, skip=skip, limit=limit)
    return users


# 특정 사용자를 조회하는 API 엔드포인트
@app.get("/users/{user_id}", response_model=schemas.User)
def read_user(user_id: int, db: Session = Depends(get_db)):
    db_user = crud.get_user(db, user_id=user_id)
    if db_user is None:
        raise HTTPException(status_code=404, detail="User not found")
    return db_user


# 특정 사용자의 아이템을 생성하는 API 엔드포인트
@app.post("/users/{user_id}/items/", response_model=schemas.Item)
def create_item_for_user(
    user_id: int, item: schemas.ItemCreate, db: Session = Depends(get_db)
):
    return crud.create_user_item(db=db, item=item, user_id=user_id)


# 아이템 목록을 조회하는 API 엔드포인트
@app.get("/items/", response_model=List[schemas.Item])
def read_items(skip: int = 0, limit: int = 100, db: Session = Depends(get_db)):
    items = crud.get_items(db, skip=skip, limit=limit)
    return items
데이터베이스 테이블 생성
models.Base.metadata.create_all(bind=engine)
의존성 함수 생성(get_db())
yield를 사용하여 의존성 함수로 만들고 이를 활용하여 여러 경로 작업에서 데이터베이스 세션을 쉽게 사용할 수 있습니다.
Path operation 생성
-
@app.post(“/users/”, response_model=schemas.User)
def create_user(user: schemas.UserCreate, db: Session = Depends(get_db)): -
@app.get(“/users/”, response_model=List[schemas.User])
def read_users(skip: int = 0, limit: int = 100, db: Session = Depends(get_db)): -
@app.get(“/users/{user_id}”, response_model=schemas.User)
def read_user(user_id: int, db: Session = Depends(get_db)): -
@app.post(“/users/{user_id}/items/”, response_model=schemas.Item)
def create_item_for_user(user_id: int, item: schemas.ItemCreate, db: Session = Depends(get_db)): -
@app.get(“/items/”, response_model=List[schemas.Item])
def read_items(skip: int = 0, limit: int = 100, db: Session = Depends(get_db)):
실행 및 테스트
sql_app/main.py를 실행합니다.
uvicorn sql_app.main:app --reload
PostgresSQL에 접속하여 테이블이 생성되었는지 확인합니다.
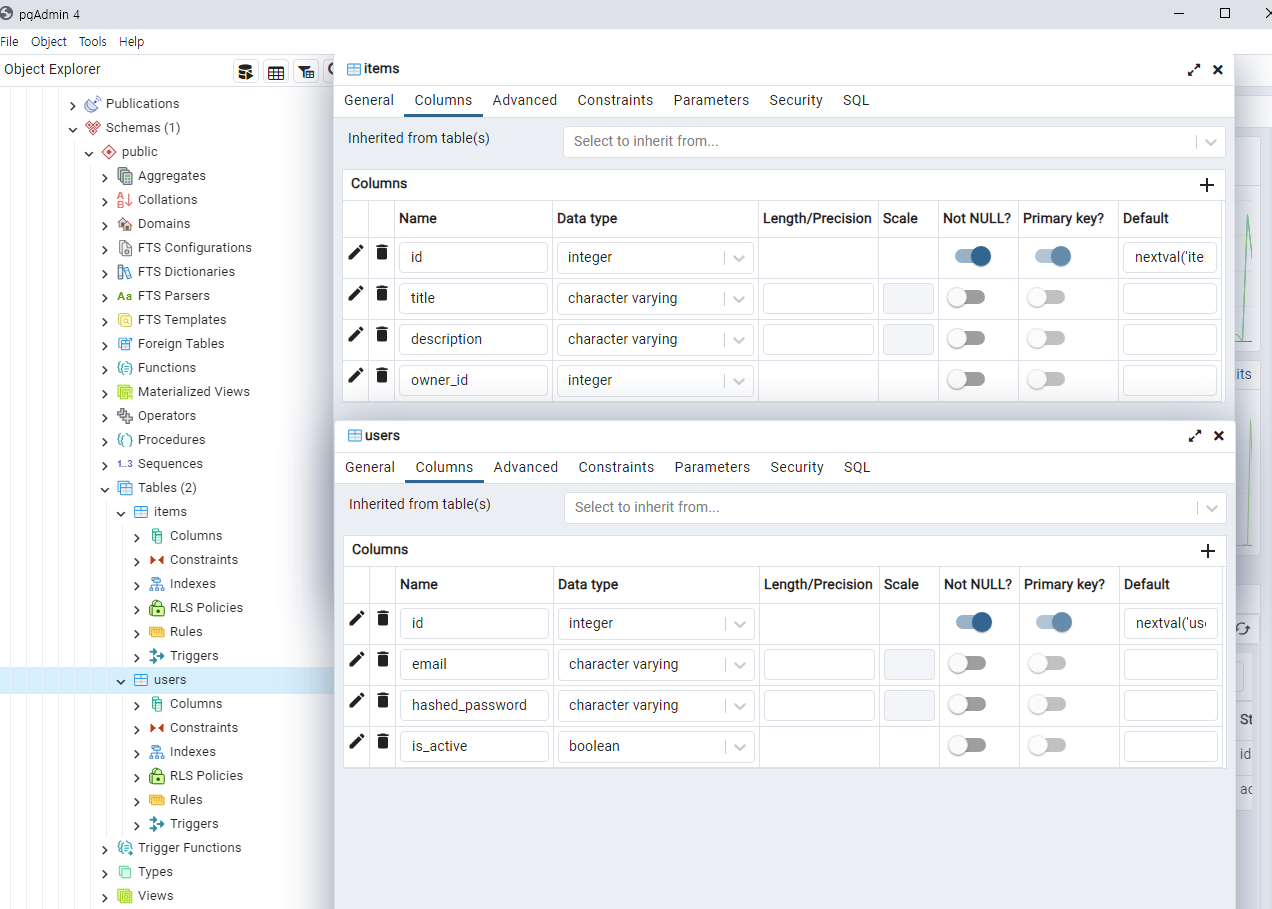
items와 users 테이블이 생성되었습니다.
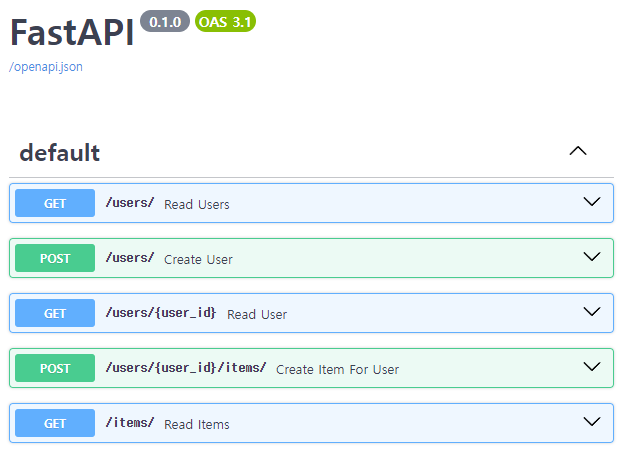
user와 item 생성 및 조회를 위해 FastAPI docs에 접속합니다.
http://localhost:8000/docs/
user 생성
post /user/ Creage User 클릭 후 Try it out을 클릭합니다.
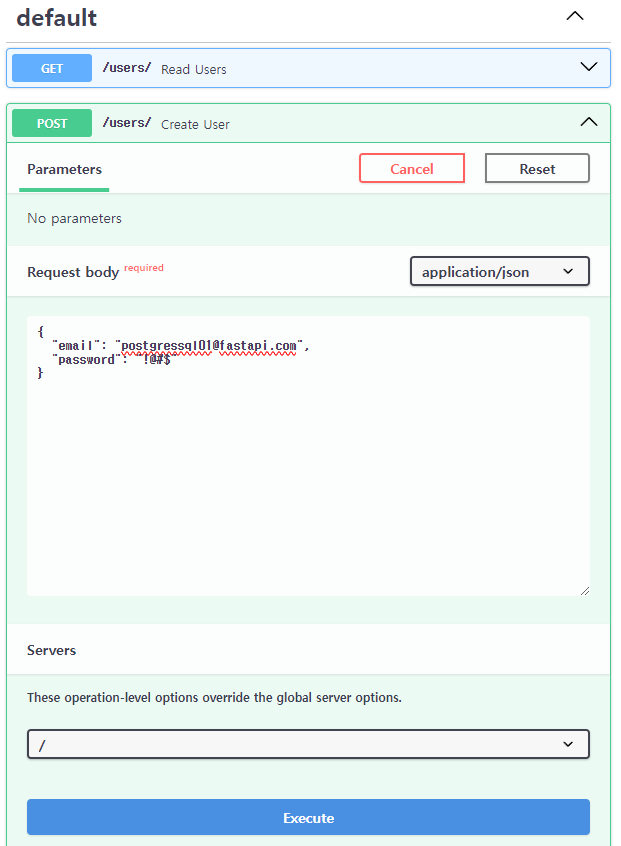
Request body에 아래와 같이 입력 후 Execute를 클릭합니다.
{
  "email": "postgressql01@fastapi.com",
  "password": "!@#$"
}
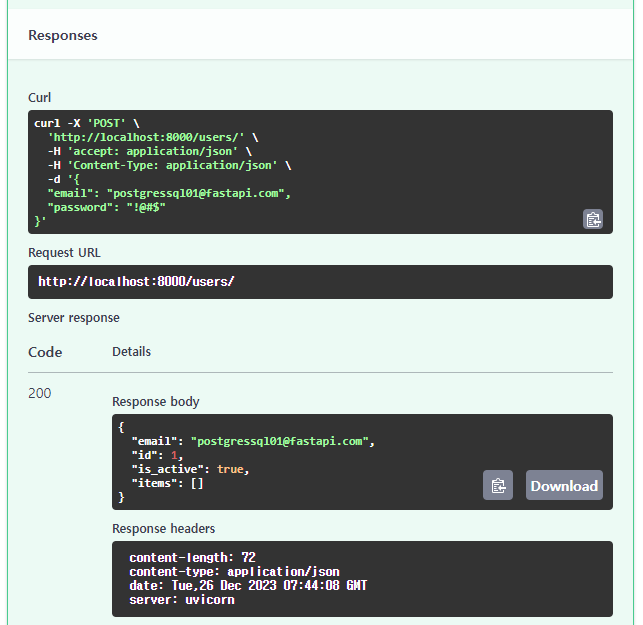
Response body에 사용자가 생성된 것을 확인 할 수 있습니다.
{
  "email": "postgressql01@fastapi.com",
  "id": 1,
  "is_active": true,
  "items": []
}
PostgreSQL의 users 테이블을 조회하겠습니다.
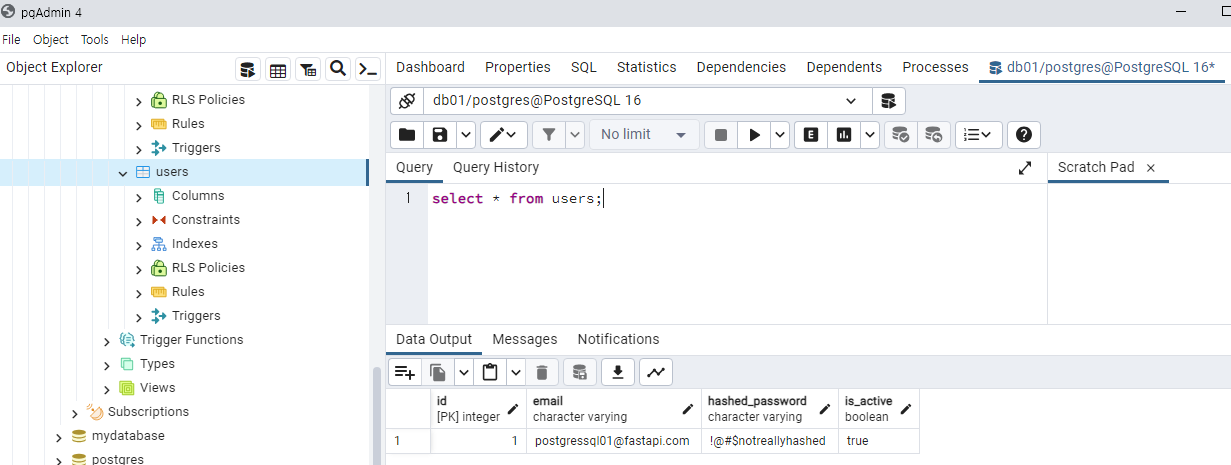
users 테이블에 사용자가 생성된 것을 확인 할 수 있습니다.
user 조회
사용자 조회는 웹 브라우저에서 URL을 입력하여 조회 하겠습니다.
http://localhost:8000/users/1
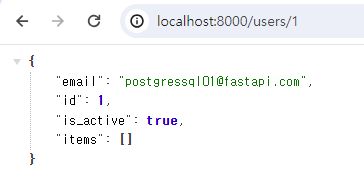
user_id 1인 사용자가 조회된 것을 확인 할 수 있습니다.
item 생성
docs에서 post /users/{user_id}/items/ Create Item For User 클릭 후 Try it out을 클릭합니다.
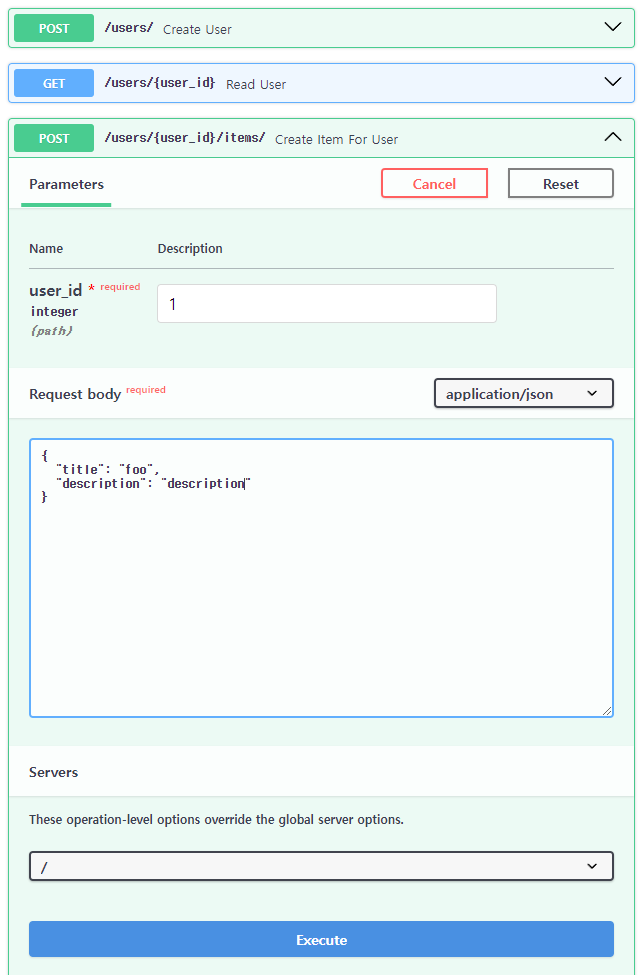
user_id에 1을 입력하고 Request body에 아래와 같이 입력 후 Execute를 클릭합니다.
{
  "title": "foo",
  "description": "description"
}
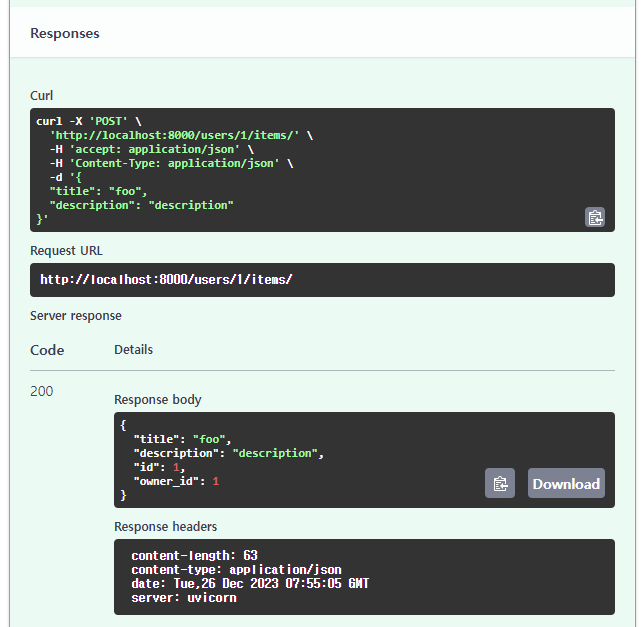
Response body에 "owner_id": 1로 아이템이 생성된 것을 확인 할 수 있습니다.
{
  "title": "foo",
  "description": "description",
  "id": 1,
  "owner_id": 1
}
PostgreSQL의 items 테이블을 조회하겠습니다.
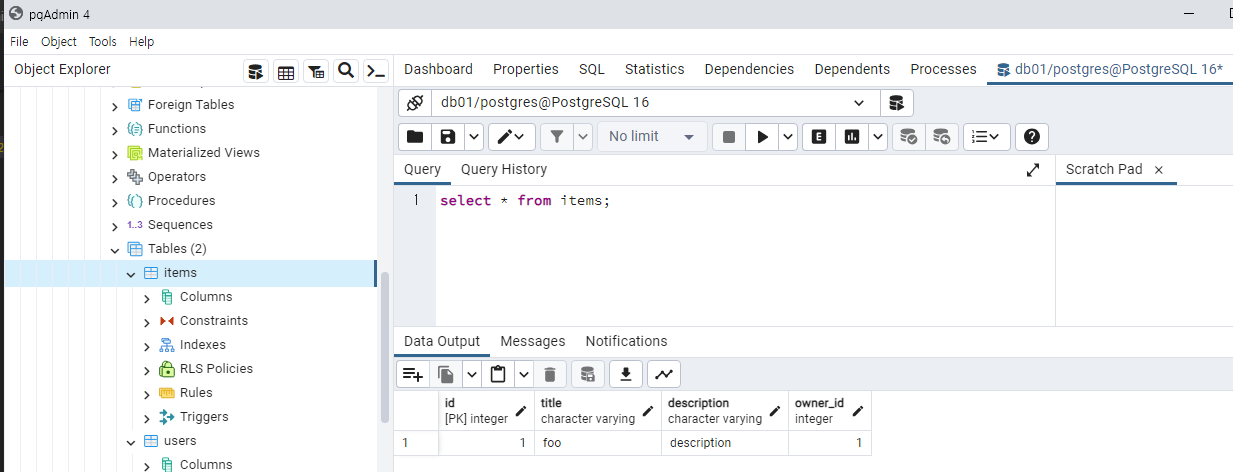
items 테이블에 아이템이 생성된 것을 확인 할 수 있습니다.
item 조회
아이템 조회는 웹 브라우저에서 URL을 입력하여 조회 하겠습니다.
http://localhost:8000/items/?skip=0&limit=100
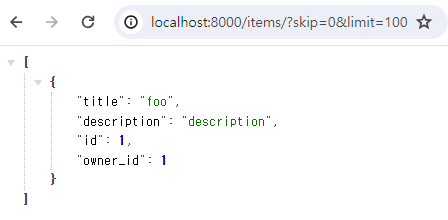
items 테이블의 아이템이 조회된 것을 확인 할 수 있습니다.
해시태그: #fastapi #uvicorn #Database #PostgresSQL #SQLAlchemy와 #ORM #psycopg2
댓글남기기