PostgreSQL - 03 (설치 - ubuntu)
설치 환경
설치는 2023년 12월 25일 기준으로 진행하였습니다.
ubuntu 버전 확인
lsb_release -a
No LSB modules are available.
Distributor ID: Ubuntu
Description:    Ubuntu 20.04.3 LTS
Release:        20.04
Codename:       focal
최종 설치 될 PostgreSQL 버전(설치 후 확인)
psql --version
psql (PostgreSQL) 12.16 (Ubuntu 12.16-0ubuntu0.20.04.1)
패키지 최신화
패키지 목록 업데이트
패키지 목록을 업데이트 합니다.
sudo apt update
Hit:1 http://repo.ncloud.com/ubuntu focal InRelease
Get:2 http://repo.ncloud.com/ubuntu focal-updates InRelease [114 kB]
Get:3 http://repo.ncloud.com/ubuntu focal-backports InRelease [108 kB]
Get:4 http://repo.ncloud.com/ubuntu focal-security InRelease [114 kB]
...
... 생략
업그레이드가 필요한 목록을 조회합니다.
sudo apt list --upgradable
Listing... Done
accountsservice/focal-updates,focal-security 0.6.55-0ubuntu12~20.04.6 amd64 [upgradable from: 0.6.55-0ubuntu12~20.04.5]
alsa-ucm-conf/focal-updates,focal-updates 1.2.2-1ubuntu0.13 all [upgradable from: 1.2.2-1ubuntu0.11]
apparmor/focal-updates 2.13.3-7ubuntu5.2 amd64 [upgradable from: 2.13.3-7ubuntu5.1]
apport/focal-updates,focal-updates 2.20.11-0ubuntu27.27 all [upgradable from: 2.20.11-0ubuntu27.21]
...
... 생략
패키지 업그레이드
실제로 패키지 업그레이드를 실행합니다.
sudo apt upgrade
Reading package lists... Done
Building dependency tree
Reading state information... Done
Calculating upgrade... Done
The following NEW packages will be installed:
...
... 생략
Y를 입력하고 Enter를 누릅니다.
Get:1 http://repo.ncloud.com/ubuntu focal-updates/main amd64 motd-news-config all 11ubuntu5.7 [4,292 B]
Get:2 http://repo.ncloud.com/ubuntu focal-updates/main amd64 libc6-dev amd64 2.31-0ubuntu9.12 [2,519 kB]
Get:3 http://repo.ncloud.com/ubuntu focal-updates/main amd64 libc-dev-bin amd64 2.31-0ubuntu9.12 [71.6 kB]
Get:4 http://repo.ncloud.com/ubuntu focal-updates/main amd64 linux-libc-dev amd64 5.4.0-167.184 [1,117 kB]
Get:5 http://repo.ncloud.com/ubuntu focal-updates/main amd64 libc6-i386 amd64 2.31-0ubuntu9.12 [2,724 kB]
...

생략

...
Processing triggers for initramfs-tools (0.136ubuntu6.7) ...
update-initramfs: Generating /boot/initrd.img-5.4.0-99-generic
Processing triggers for systemd (245.4-4ubuntu3.22) ...
Processing triggers for dbus (1.12.16-2ubuntu2.3) ...
패키지 업그레이드가 완료되었습니다.
참고
- update: 설치 가능한 패키지 목록(만) 업데이트
- upgrade: 실제 패키지를 업데이트
설치
PostgreSQL 설치 합니다.
sudo apt install postgresql postgresql-contrib
Reading package lists... Done
Building dependency tree
Reading state information... Done
The following additional packages will be installed:
  libllvm10 libpq5 libsensors-config libsensors5 postgresql-12 postgresql-client-12 postgresql-client-common postgresql-common ssl-cert sysstat
Suggested packages:
  lm-sensors postgresql-doc postgresql-doc-12 libjson-perl openssl-blacklist isag
The following NEW packages will be installed:
  libllvm10 libpq5 libsensors-config libsensors5 postgresql postgresql-12 postgresql-client-12 postgresql-client-common postgresql-common postgresql-contrib ssl-cert sysstat
0 upgraded, 12 newly installed, 0 to remove and 0 not upgraded.
Need to get 30.7 MB of archives.
After this operation, 122 MB of additional disk space will be used.
Do you want to continue? [Y/n]
Y를 입력하고 Enter를 누릅니다.
Get:1 http://repo.ncloud.com/ubuntu focal/main amd64 libllvm10 amd64 1:10.0.0-4ubuntu1 [15.3 MB]
Get:2 http://repo.ncloud.com/ubuntu focal-updates/main amd64 libpq5 amd64 12.16-0ubuntu0.20.04.1 [115 kB]
Get:3 http://repo.ncloud.com/ubuntu focal-updates/main amd64 libsensors-config all 1:3.6.0-2ubuntu1.1 [6,052 B]
Get:4 http://repo.ncloud.com/ubuntu focal-updates/main amd64 libsensors5 amd64 1:3.6.0-2ubuntu1.1 [27.2 kB]
Get:5 http://repo.ncloud.com/ubuntu focal-updates/main amd64 postgresql-client-common all 214ubuntu0.1 [28.2 kB]
...

생략

...
Processing triggers for systemd (245.4-4ubuntu3.22) ...
Processing triggers for man-db (2.9.1-1) ...
Processing triggers for libc-bin (2.31-0ubuntu9.12) ...
PostgreSQL 설치가 완료되었습니다.
설치 버전 확인
psql --version
psql (PostgreSQL) 12.16 (Ubuntu 12.16-0ubuntu0.20.04.1)
설치 확인
설치가 완료되었는지 확인합니다.
PostgreSQL 프로세스가 실행되고 있는지 확인합니다.
ps -ef | grep post
postgres   46888       1  0 12:59 ?        00:00:00 /usr/lib/postgresql/12/bin/postgres -D /var/lib/postgresql/12/main -c config_file=/etc/postgresql/12/main/postgresql.conf
postgres   46890   46888  0 12:59 ?        00:00:00 postgres: 12/main: checkpointer
postgres   46891   46888  0 12:59 ?        00:00:00 postgres: 12/main: background writer
postgres   46892   46888  0 12:59 ?        00:00:00 postgres: 12/main: walwriter
postgres   46893   46888  0 12:59 ?        00:00:00 postgres: 12/main: autovacuum launcher
postgres   46894   46888  0 12:59 ?        00:00:00 postgres: 12/main: stats collector
postgres   46895   46888  0 12:59 ?        00:00:00 postgres: 12/main: logical replication launcher
root       48310    1394  0 13:00 pts/0    00:00:00 grep --color=auto post
PostgreSQL 포트(5432) 리스닝 여부를 확인합니다.
ss -lntp | grep ':5432'
LISTEN 0 244 127.0.0.1:5432 0.0.0.0:* users:(("postgres",pid=46888,fd=3))
PostgreSQL 서비스가 등록되었고 활성화 되었는지 확인합니다.
systemctl status postgresql
● postgresql.service - PostgreSQL RDBMS
     Loaded: loaded (/lib/systemd/system/postgresql.service; enabled; vendor preset: enabled)
     Active: active (exited) since Mon 2023-12-25 12:59:33 KST; 2min 23s ago
   Main PID: 46638 (code=exited, status=0/SUCCESS)
      Tasks: 0 (limit: 4590)
     Memory: 0B
     CGroup: /system.slice/postgresql.service

Dec 25 12:59:33 s18c9f0607e6 systemd[1]: Starting PostgreSQL RDBMS...
Dec 25 12:59:33 s18c9f0607e6 systemd[1]: Finished PostgreSQL RDBMS.
서비스 중지 및 시작
- 서비스 상태 확인: sudo systemctl status postgresql
- 서비스 중지: sudo systemctl stop postgresql
- 서비스 시작: sudo systemctl start postgresql
- 서비스 재시작: sudo systemctl restart postgresql
- 서비스 다시 로드: sudo systemctl reload postgresql
사용자 추가 및 데이터베이스 생성
PostgreSQL 서버에 접속합니다.
sudo -u postgres psql
psql (12.8 (Ubuntu 12.8-0ubuntu0.20.04.1))
Type "help" for help.

postgres=#
사용자를 추가합니다.
create user user01 password 'user01password' superuser;
superuser등급의 사용자 user01에 user01password를 패스워드로 하여 추가합니다.
CREATE ROLE
추가 된 사용자를 조회합니다.
\du
                                   List of roles
 Role name |                         Attributes                         | Member of
-----------+------------------------------------------------------------+-----------
 postgres  | Superuser, Create role, Create DB, Replication, Bypass RLS | {}
 user01    | Superuser                                                  | {}
데이터베이스를 생성합니다.
create database db01 owner user01;
db01 데이터베이스를 user01 사용자가 소유하도록 생성합니다.
CREATE DATABASE
데이터베이스를 조회합니다.
\l
                                  List of databases
   Name    |  Owner   | Encoding |   Collate   |    Ctype    |   Access privileges
-----------+----------+----------+-------------+-------------+-----------------------
 db01      | user01   | UTF8     | en_US.UTF-8 | en_US.UTF-8 |
 postgres  | postgres | UTF8     | en_US.UTF-8 | en_US.UTF-8 |
 template0 | postgres | UTF8     | en_US.UTF-8 | en_US.UTF-8 | =c/postgres          +
           |          |          |             |             | postgres=CTc/postgres
 template1 | postgres | UTF8     | en_US.UTF-8 | en_US.UTF-8 | =c/postgres          +
           |          |          |             |             | postgres=CTc/postgres
종료합니다.
\q
원격 접속 설정
ubuntu 서버에 PostgreSQL을 설치하고 원격(개발 컴퓨터 - 윈도우/맥)에서 접속을 하겠습니다.
PostgreSQL을 원격에서 접속하기 위해서는 추가 설정이 필요합니다.
PosetgresSQL 서버에서 원격 접속 허용
postgresql.conf 파일을 수정합니다.
‘postgresql.conf’ 파일은 PostgreSQL의 설정에 관련 된 파일입니다.
Listing을 하는 ip 주소를 *로 변경하고 포트를 15432로 변경하겠습니다.
기본 포트는 모두가 알고 있기 때문에 보안을 위해 포트를 변경 하는 것이 좋습니다.
sudo vi /etc/postgresql/12/main/postgresql.conf
listen_addresses를 찾아서 주석을 제거하고 *를 입력합니다.
port를 찾아서 15432로 변경합니다.(여러분이 원하시는 포트로 변경하시면 됩니다.)
listen_addresses = '*'         # what IP address(es) to listen on;
port = 15432                   # (change requires restart)
listen_addresses = ‘*‘은 모든 ip 주소에서 접속을 허용하겠다는 의미입니다.

파일을 저장하고 종료합니다.
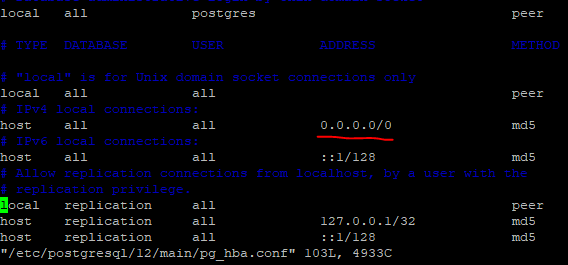
pg_hba.conf 파일을 수정합니다.
‘pg_hba.conf’는 클라이언트의 인증에 관련된 설정을 하는 파일입니다.
sudo vi /etc/postgresql/12/main/pg_hba.conf
# IPv4 local connections:
host    all             all             127.0.0.1/32            md5
를 찾아서 아래와 같이 수정합니다.
# IPv4 local connections:
host    all             all             0.0.0.0/0            md5
0.0.0.0/0은 모든 ip 주소에서 접속을 허용하겠다는 의미입니다.
파일을 저장하고 종료합니다.
PostgreSQL을 재시작 합니다.
sudo systemctl restart postgresql
Port 15432 리스닝을 확인합니다.
ss -lntp | grep ':15432'
결과
LISTEN    0         244                0.0.0.0:15432            0.0.0.0:*        users:(("postgres",pid=1897,fd=3))
LISTEN    0         244                   [::]:15432               [::]:*        users:(("postgres",pid=1897,fd=4))
방화벽 설정(서버 상황에 따라 설정)
ubuntu 서버의 방화벽에서 PostgreSQL 포트(15432)를 허용하겠습니다.
sudo ufw allow 15432/tcp
결과
Rule added
Rule added (v6)
방화벽 상태를 확인합니다.
sudo ufw status
상태: 활성

목적                         동작          출발
--                         --          --
...
15432/tcp                  ALLOW       Anywhere
15432/tcp (v6)             ALLOW       Anywhere (v6)
...
만약 방화벽이 비활성화 되어 있다면 아래 명령어로 방화벽을 활성화 합니다.
sudo ufw enable
pgAdmin로 접속
이전 포스트(PostgreSQL - 02 (pgAdmin))의 pgAdmin으로 접속하겠습니다.
서버 추가
접속하기 위해 서버를 추가합니다.
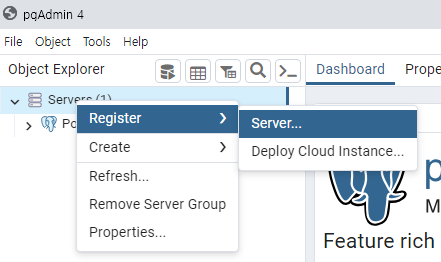
pgAdmin4를 실행하고 Servers를 마우스 오른쪽 버튼으로 클릭하고 Create > Server...를 선택합니다.

General 탭에서 Name에 서버 이름을 입력합니다. 저는 PostgreSQL-TEST를 입력하였습니다.
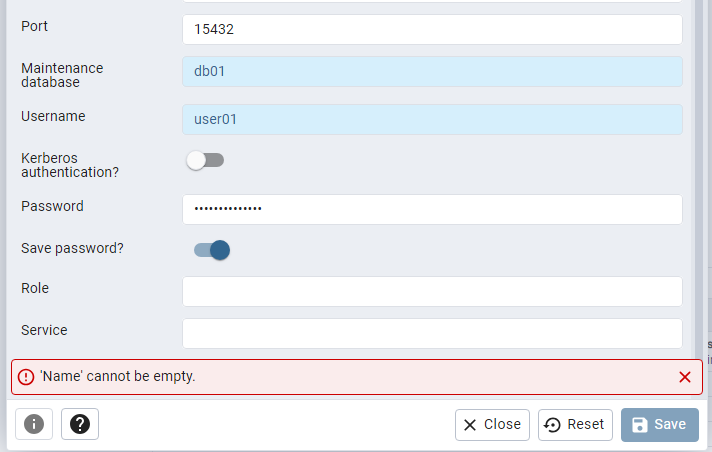
Connection 탭에서
Host name/address: PostgreSQL을 설치한 ubuntu 서버의 IPMaintenance database: 조금 전 추가한 데이터베이서 인 ‘db01’Username: 조금 전 추가한 사용자 ‘user01’Passowrd: 조금 전 추가한 사용자의 password ‘user01password’Save password: check
Save를 클릭합니다.
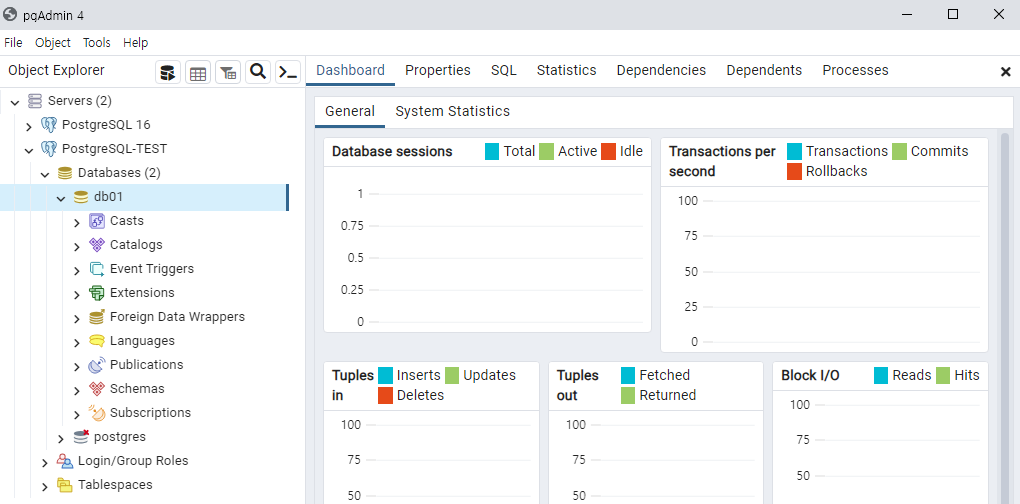
원격에서 ubuntu 서버의 PostgreSQL에 접속 하였습니다.
테이블 생성 및 데이터 입력
이전 포스트(PostgreSQL - 02 (pgAdmin4))를 참고 하세요.
해시태그: #postgresql #ubuntu20.04 #설치 #원격접속허용 #원격서버접속 #사용자생성 #데이터베이스생성 #pgAdmin
댓글남기기